Cooking With Kaya (kind of) Episode 2: FRIED CHICKEN!!!

Fried chicken faces in effect.

Time flies.  The older I get, the more that’s true. It’s been over half a year since the last post, which I’ll admit is kind of standard for me (which might explain the fact that this blog has a readership of about 6.3 people).  More hard to believe, it’s been almost a decade since I started this here food blog. In that time – the posts in this blog provide documentation – Shefali and I got married, had a kid, moved from Brooklyn to Oakland, had another kid and well, continue to just live our rather ordinary lives.  One of those markers of ordinary life came couple weeks ago when Kaya started kindergarten. But before her official start,  she and I had an opportunity to hang out – quality time, just father and daughter.  So I thought, what better way to spend time together bonding then making another food video?!  Genius, right?!  Kaya, was maybe a little less enthusiastic.  I mean I’ve been subjecting her to these vids since she was a fat little baby (when we both looked a lot younger).  So, she wasn’t really feeling it, having her own thoughts and all, but I’m her dad and I can still make her do stuff, so that’s cool.  You’ll see in the video.

In any case, I wanted to make something that despite the passage of time has remained a constant in my life: fried chicken. I. Love. Fried. Chicken. It’s got to be up there in my top 5 of all time favorite foods. I will never turn down a piece of fried chicken.  It has been there for me, always. For example, when I was maybe five or six and my mom accidentally chopped the tip of her middle finger off with a cleaver when she was cutting up a roast duck. Now, I actually look back on that episode with fondness  because 1) well, it wasn’t my finger and I was napping when it happened and 2) because while my mom and my dad rushed to the emergency, finger tip packed in a cup of ice so doctors could sew it back on, my aunt and uncle took me and my sister to Kentucky Fried Chicken (before it was rebranded as KFC) where we feasted on salty, greasy goodness. Later when I was a teenager and my parents had a night out, they’d let me eat whatever I wanted and I always got a box of frozen Banquet Fried Chicken (spicy) and I’d polish off about three or four pieces in a sitting.  As an adult, I’ve been fortunate to have my horizons expanded – at least when it comes to fried chicken. From southern style (American) fried chicken to to Japanese karaage chicken, I’ve made room for all of them in my heart and stomach.  I’d say pretty much everybody around the world loves fried chicken and everybody does a version of it. In my  humble opinion, it’s all good. I’m a globalist. I admit it.

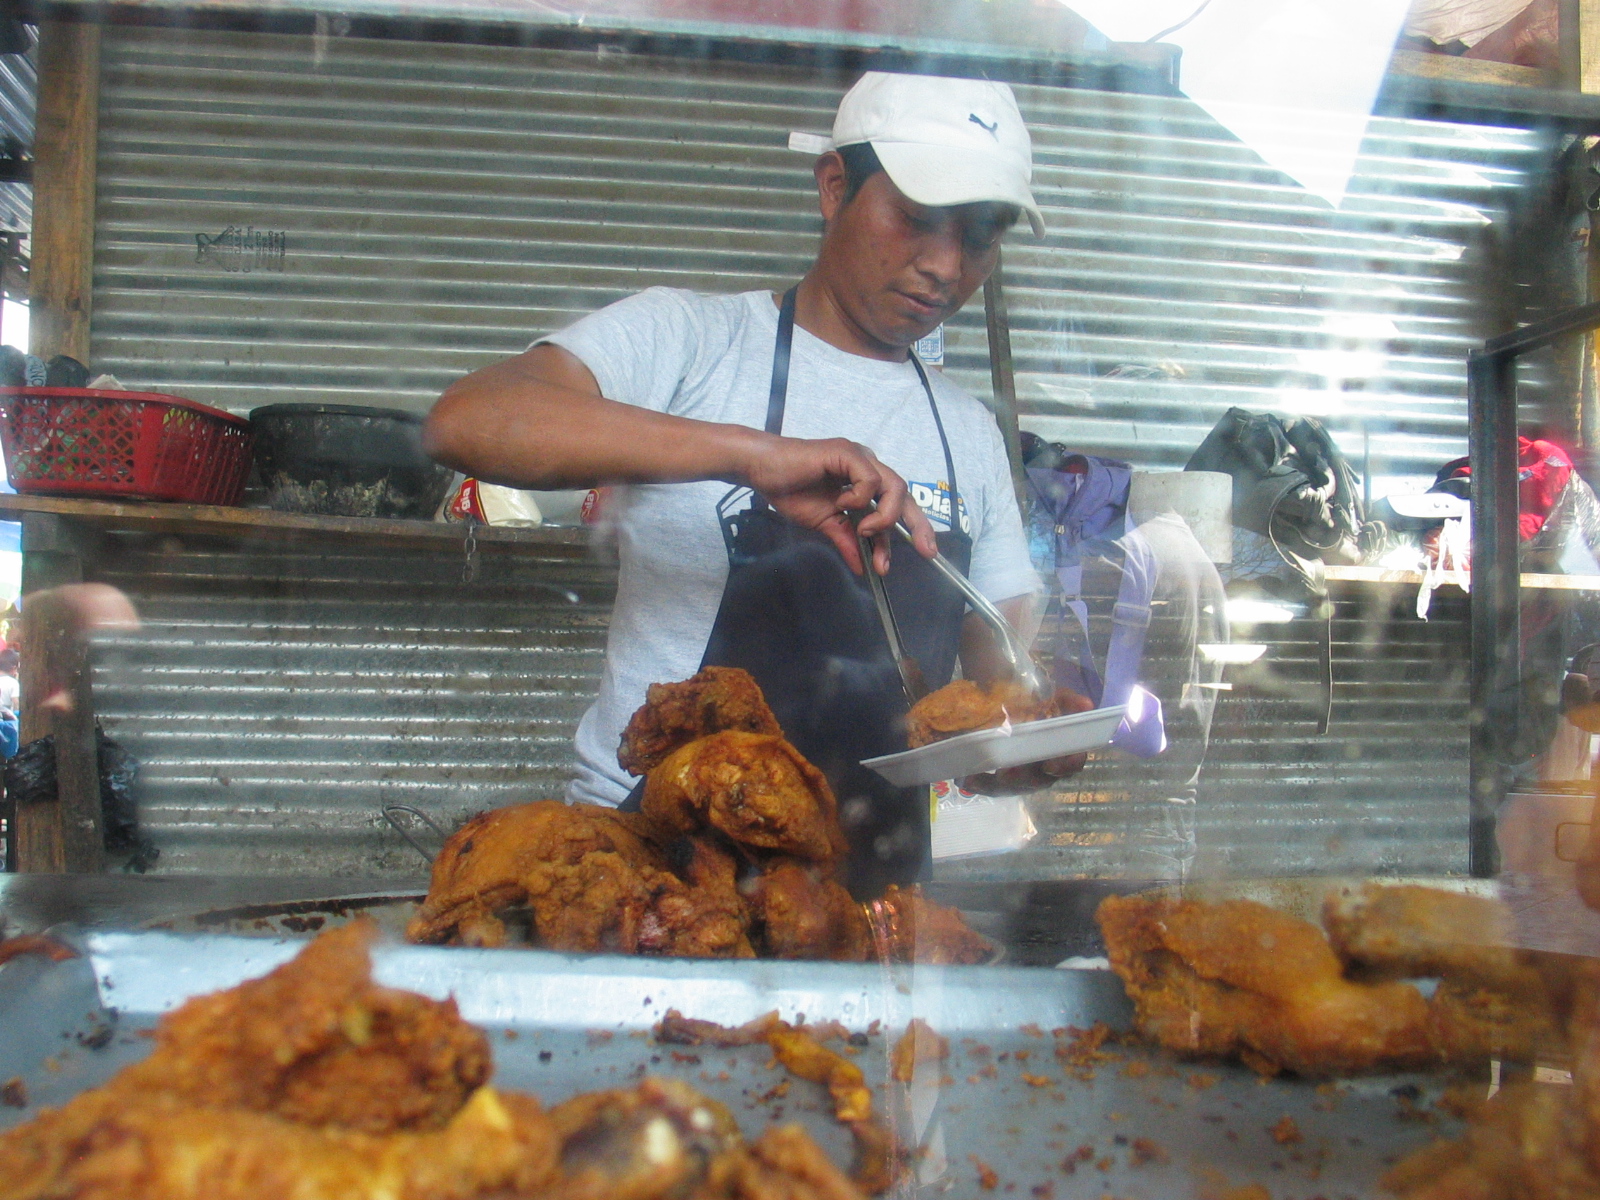
I found this vendor in a bus stop in Antigua, Guatemala.

I found this fried chicken in a market in Pai, Northern Thailand. I tried to have at least one piece of fried chicken a day there, often for breakfast.

I’m happy to say that love for chicken that is fried has been passed on to my daughter. Nature? Nurture?  Does the fried chicken come before the fried egg or vice versa? These are deep questions, I know. Welcome to my life. But I digress. One of my favorite versions is Thai style fried chicken. It’s got a lighter skin (rice flour instead of wheat flour) and the meat is often marinated beforehand (basically, brining does the same thing) so that the meat has a lot of flavor as opposed to just the skin or batter (don’t get me wrong, I love that too).  It’s also reminiscent of the fried chicken my dad used to make for us when we were kids and he was getting really into cooking.  He used bread crumbs for his coating though. Anyway this is the version I decided to make with Kaya.

Here’s the Ingredient list (amounts are approximates, as usual).

Marinade Ingredients
1/2 cup soy sauce
1/3 cup fish sauce
3-5 cloves of garlic
1 tbsp of ginger
3-4 tbsp of lemongrass
bunch of cilantro
2 1/2 tbsp of sugar

5 lbs of chicken legs (drumsticks and thighs) – you can also use little wings and drumettes)
rice flour to coat chicken pieces
oil to fry

And here’s the all important video for how we do it. Watch, learn and enjoy.


Share

Manu’s Handmade Pasta

This is how you roll it...

This is how you roll it…

A couple months ago, Shef, K and I made the momentous move back from Brooklyn, NY to the Brooklyn of the Bay Area aka Oakland, CA.  At least that’s the comparison made by NYC- centric foks.  I’ll be honest.  There’s a fair smattering of hipsters and quite a healthy foodie scene here but I would say that’s a national trend and not just a Brooklyn thing.  Anyway,  a few weeks in, to help ease us into West Coast living, our good friends Matt (whom you might remember from such hits at sourdough baby, wood oven pizza and belated Chinese New Year) and Arlie invited some of their good friends (Manu, Simba, Cree and Dan) over to our place for some dinner.  But these weren’t just any friends and this wasn’t just some dinner.  The guest of honor (or rather chef of honor) was Manu who, being Italian, brought with her the requisite skills of making pasta – by hand.  See, in my limited world view, all Italians know how to make pasta, just like all Chinese people know how to fold dumplings. Thankfully in this case, my ridiculous cultural expectations proved correct because Manu brought with her some real knowledge and skills.  In fact, she instructed us in the production of TWO types of pasta: orecchiette and pici.

Both pastas are so simple to make and when cooked are exponentially better than dried pasta.  Now, I understand why the term al dente (to the teeth) has been used to describe the way pasta should be cooked. There’s something about the fresh, hand worked dough, the thicker noodle and shorter boiling time that results in pasta that has that balanced, dense, springy but totally cooked texture.  It has real substance. It  requires you to actually pause and chew so you can really appreciate the pasta, the sauce, the company around you and the witty conversation that erupts between bites. No wonder the slow food movement started in Italy.  Part of that slowness must surely have to do with  the preparation.  Making pasta by hand -especially by amateur hand –  is a rather labor intensive process so it was great to have friends over who could throw down like they were in the old country. The next night when I made the orecchiette and pici by myself with the leftover dough, it took a lot longer. But again, the end product was ridiculously good. Now, I’m not tooting my own horn. I’m tooting the horn of homemade pasta. Hallelujah!

Made all of these "little ears" with my own hands.

Made all of these “little ears” with my own hands.

Here’s Manu’s recipe for the orecchiette:
semolina flour
water
that’s it!

And here are the ingredients for the sauce she made for the orecchiette (quantities are dependent on how much pasta you’re cooking):
broccoli, kale (though if you can find it you should use rapini or broccoli rabe)
garlic
chili
Italian sausage
salt
pepper
olive oil

And this is how she does it:

Here’s Manu’s recipe for the pici:
2 parts white all purpose flour
1 part semolina
pinch of salt
water
that’s it!

And here’s Manu’s recipe for the sauce she made for the pici:
ripe tomatoes
1 green tomato for extra acidity
garlic
olive oil
salt
bread crumbs fried in olive oil

And here’s how she does it.

Share

Thai Cooking Made Easy! (Well, as experienced in a touristy cooking class…)

Along with cooking we also learned how to carve these carrots out of flowers.  Can you tell which one is Shefali's and which one is mine? (hint: mine looks like it was carved using a knife and not teeth)

Along with cooking we also learned how to carve these carrots out of flowers. Can you tell which one is Shefali’s and which one is mine? (hint: mine looks like it was carved using a knife and not my teeth)

I’m sure if you saw the previous post about pad thai, you’re aware of how highly I regard Thai food, both for its preparation and its dynamic flavors. Also, I’m a fan of employing badly shot vacation video from almost two years ago to give the few lucky readers of this blog an opportunity to savor more Thai food and watch Shefali and I stumble through the preparation of some basic Thai dishes.  You see, the summer before last, before Kaya and her voracious appetite made themselves known – actually, I think Shef was in the early stages of pregnancy with K (aka “The Eater”) – we were fortunate to find ourselves in Chiang Mai, Thailand, recuperating from our trip to India.  Believe me, Northern Thailand is the place to go for relaxing and eating.  As full fledged tourists, we enrolled in a one day cooking class at the Siam Rice Thai Cookery School. Now, I fancy myself as somewhat knowledgeable about food and the way its prepared – Asian food in particular. Oh, I don’t know, maybe because I’m ASIAN? Sheeit! So I didn’t know how much I’d really get out of this class. Well, feed me some humble pie, because I got a whole lot of spicy goodness out of it. It was great!  The recipes were obviously dumbed down for farang students, but what really came through (bubbled up to the surface as it were) was the importance of using the freshest ingredients and cooking things quickly and with the intensity of high eat to seal in flavors. I don’t want to toot my own horn, but some of dishes I cooked in this class, I’d consider among the best Thai food I’ve eaten.  So without further ado, please enjoy these two videos which chronicle both our trip to the market and our cooking class. Please enjoy!

Part 1

Part 2

Share

C’s Chile Verde

Pork and green chili stew = happy

Hey Everybody! Long time no blog. Yeah, life has a way of taking over when one isn’t blogging. And also, one is kind of lazy. But one – okay me, well I’m back and I’ve brought with me an actual cooking video. As we find ourselves firmly entrenched in fall with winter on the horizon, I give to you the gift of chile verde. It’s a spicy and savory pork and chili stew – I prefer the Spanish spelling when naming the dish, the Anglo spelling when talking about actual chilis. It’s the perfect meal to keep you warm and satisfied on the inside and happy to be alive. Yeah, it’s pretty powerful stuff. Also, it’s bien rico (rather, extremely delicious).

I first encountered chile verde as a wee lad growing up in San Jose, CA when my parents took my sister and I to our favorite Mexican restaurant, El Burro.  Now having experienced a lot of good (and terrible – in NYC for sure) Mexican food, I’m not sure El Burro would necessarily hold up as a great Mexican restaurant. But there’s something about that dimly lit cavern of a restaurant – with it’s big leather bucket seats,  the pictures of bull fighters and rustic country scenes on the walls and the tortillas chips served with the most watery and bland (in retrospect) salsa – that holds a special place in my heart.  I remember my dad would always order the chile verde which consisted of tender cubes of pork served in a sea of really hot (temperature-wise) mildly spicy green sauce.  In between mouthfuls of chorizo enchilada (my go to dish at the time) I remember tasting the stewed pork and thinking, “not bad, not bad at all!”  Since those formative years, chile verde has become one of my go to dishes both when I order it, say stuffed inside a chimichanga or as a stand alone stew that I love to cook myself.  So, what follows is my version of chile verde,  a recipe that I’ve kind of developed over the last few years through trial and error and tasting of other versions of chile verde. For example, I used to not use tomatillos but after eating chile verde with tomatillos,  I now find them to be a a vital ingredient imparting the necessary acid or tartness that counter balances the spiciness of the chili and the richness of the pork.  So without further ado, here’s the recipe:

Ingredients: (as usual amounts are approximate)
1 head of garlic
2 mid sized onions
5-6 poblano chilis
1 1/2 lbs of tomatillos (can use tomatillo salsa)
1 1/2 pounds of potatoes
3-4 carrots
4 lbs of pork shoulder meat
Salt to taste
Pepper to taste
Oregano to taste
2-3 tablespoons of vinegar (for marinating the pork)

This is how I do it:

Share

C’s Hot Wings!

My attempt at plating. Anyway, you get the idea. Wings and drumettes with sauce.

Alright, I meant to put this up before the Super Bowl, but I got waylaid by Chinese New Year’s festivities (stay tuned for a future posting).  So football season is now officially over.  But really, who needs to watch grown men running around in skin tight pants, head butting each other in order to enjoy spicy and delicious chicken wings?  I, for one, do not.  And neither should you.  It’s always the right time for hot wings.

Here’s the recipe (as usual, quantities are suggested):

Ingredients:
8 oz chipotle peppers in adobo (or from 1/2 cup to 3/4 – depending on how spicy you want it)
2 – 3 tsp to of fish sauce
1-2 tsp of vinegar
1 tbsp of ginger
1-2 tsp of garlic
2-3 tbsp of plain yogurt
2 1/2 lbs of chicken wings

Here’s how you do it:

Share