Manu’s Handmade Pasta

This is how you roll it...

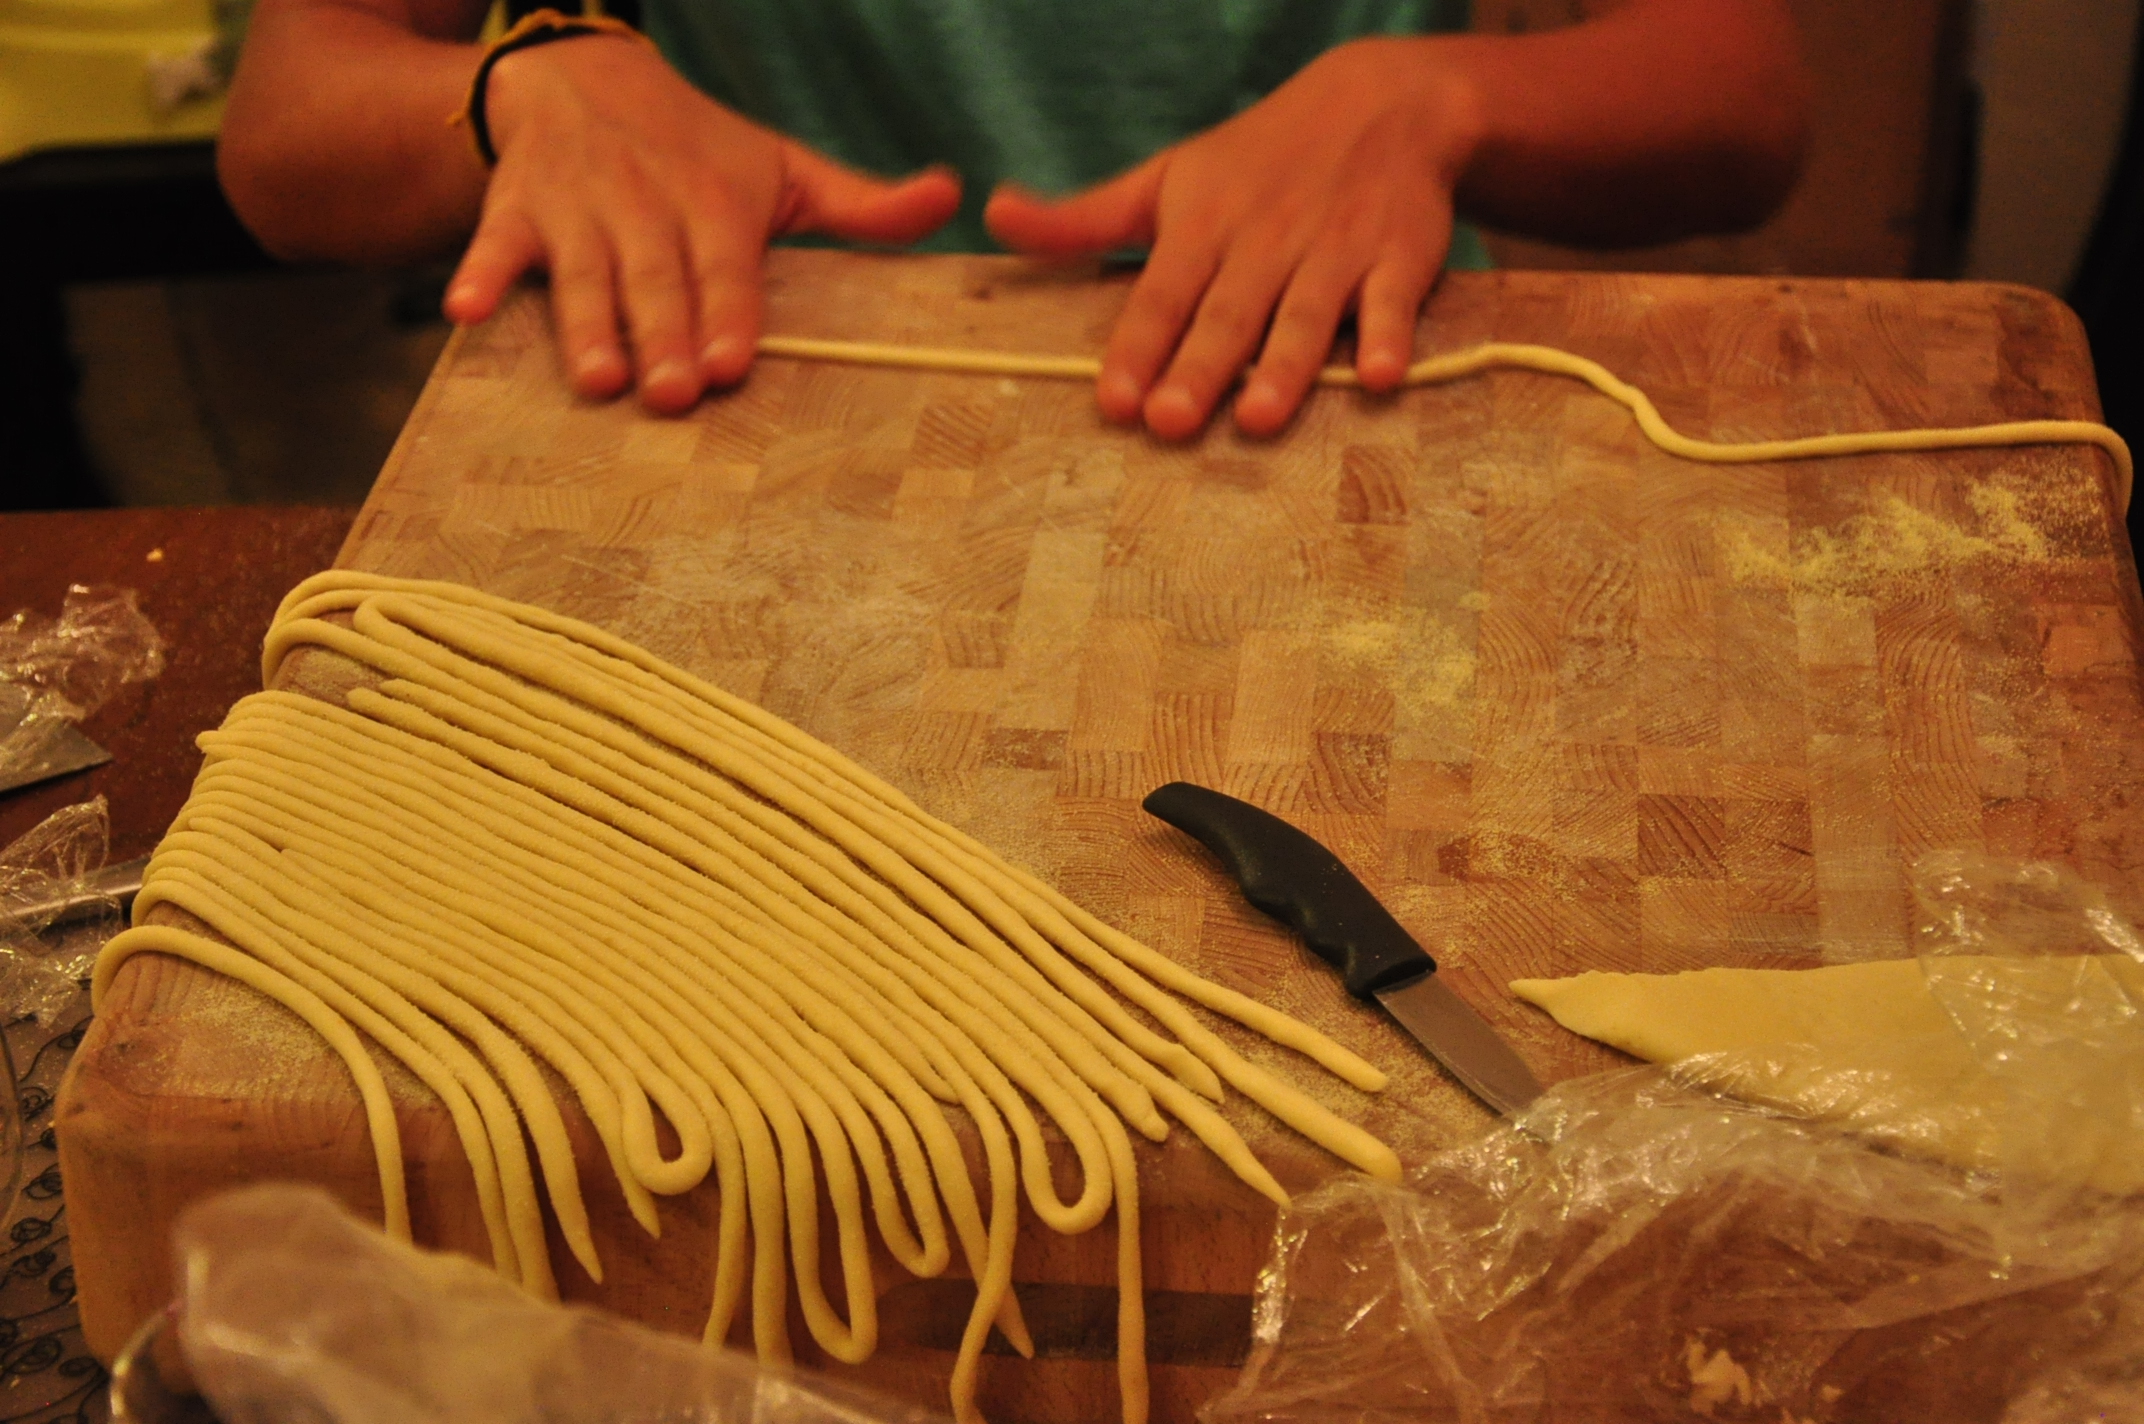
This is how you roll it…

A couple months ago, Shef, K and I made the momentous move back from Brooklyn, NY to the Brooklyn of the Bay Area aka Oakland, CA.  At least that’s the comparison made by NYC- centric foks.  I’ll be honest.  There’s a fair smattering of hipsters and quite a healthy foodie scene here but I would say that’s a national trend and not just a Brooklyn thing.  Anyway,  a few weeks in, to help ease us into West Coast living, our good friends Matt (whom you might remember from such hits at sourdough baby, wood oven pizza and belated Chinese New Year) and Arlie invited some of their good friends (Manu, Simba, Cree and Dan) over to our place for some dinner.  But these weren’t just any friends and this wasn’t just some dinner.  The guest of honor (or rather chef of honor) was Manu who, being Italian, brought with her the requisite skills of making pasta – by hand.  See, in my limited world view, all Italians know how to make pasta, just like all Chinese people know how to fold dumplings. Thankfully in this case, my ridiculous cultural expectations proved correct because Manu brought with her some real knowledge and skills.  In fact, she instructed us in the production of TWO types of pasta: orecchiette and pici.

Both pastas are so simple to make and when cooked are exponentially better than dried pasta.  Now, I understand why the term al dente (to the teeth) has been used to describe the way pasta should be cooked. There’s something about the fresh, hand worked dough, the thicker noodle and shorter boiling time that results in pasta that has that balanced, dense, springy but totally cooked texture.  It has real substance. It  requires you to actually pause and chew so you can really appreciate the pasta, the sauce, the company around you and the witty conversation that erupts between bites. No wonder the slow food movement started in Italy.  Part of that slowness must surely have to do with  the preparation.  Making pasta by hand -especially by amateur hand –  is a rather labor intensive process so it was great to have friends over who could throw down like they were in the old country. The next night when I made the orecchiette and pici by myself with the leftover dough, it took a lot longer. But again, the end product was ridiculously good. Now, I’m not tooting my own horn. I’m tooting the horn of homemade pasta. Hallelujah!

Made all of these "little ears" with my own hands.

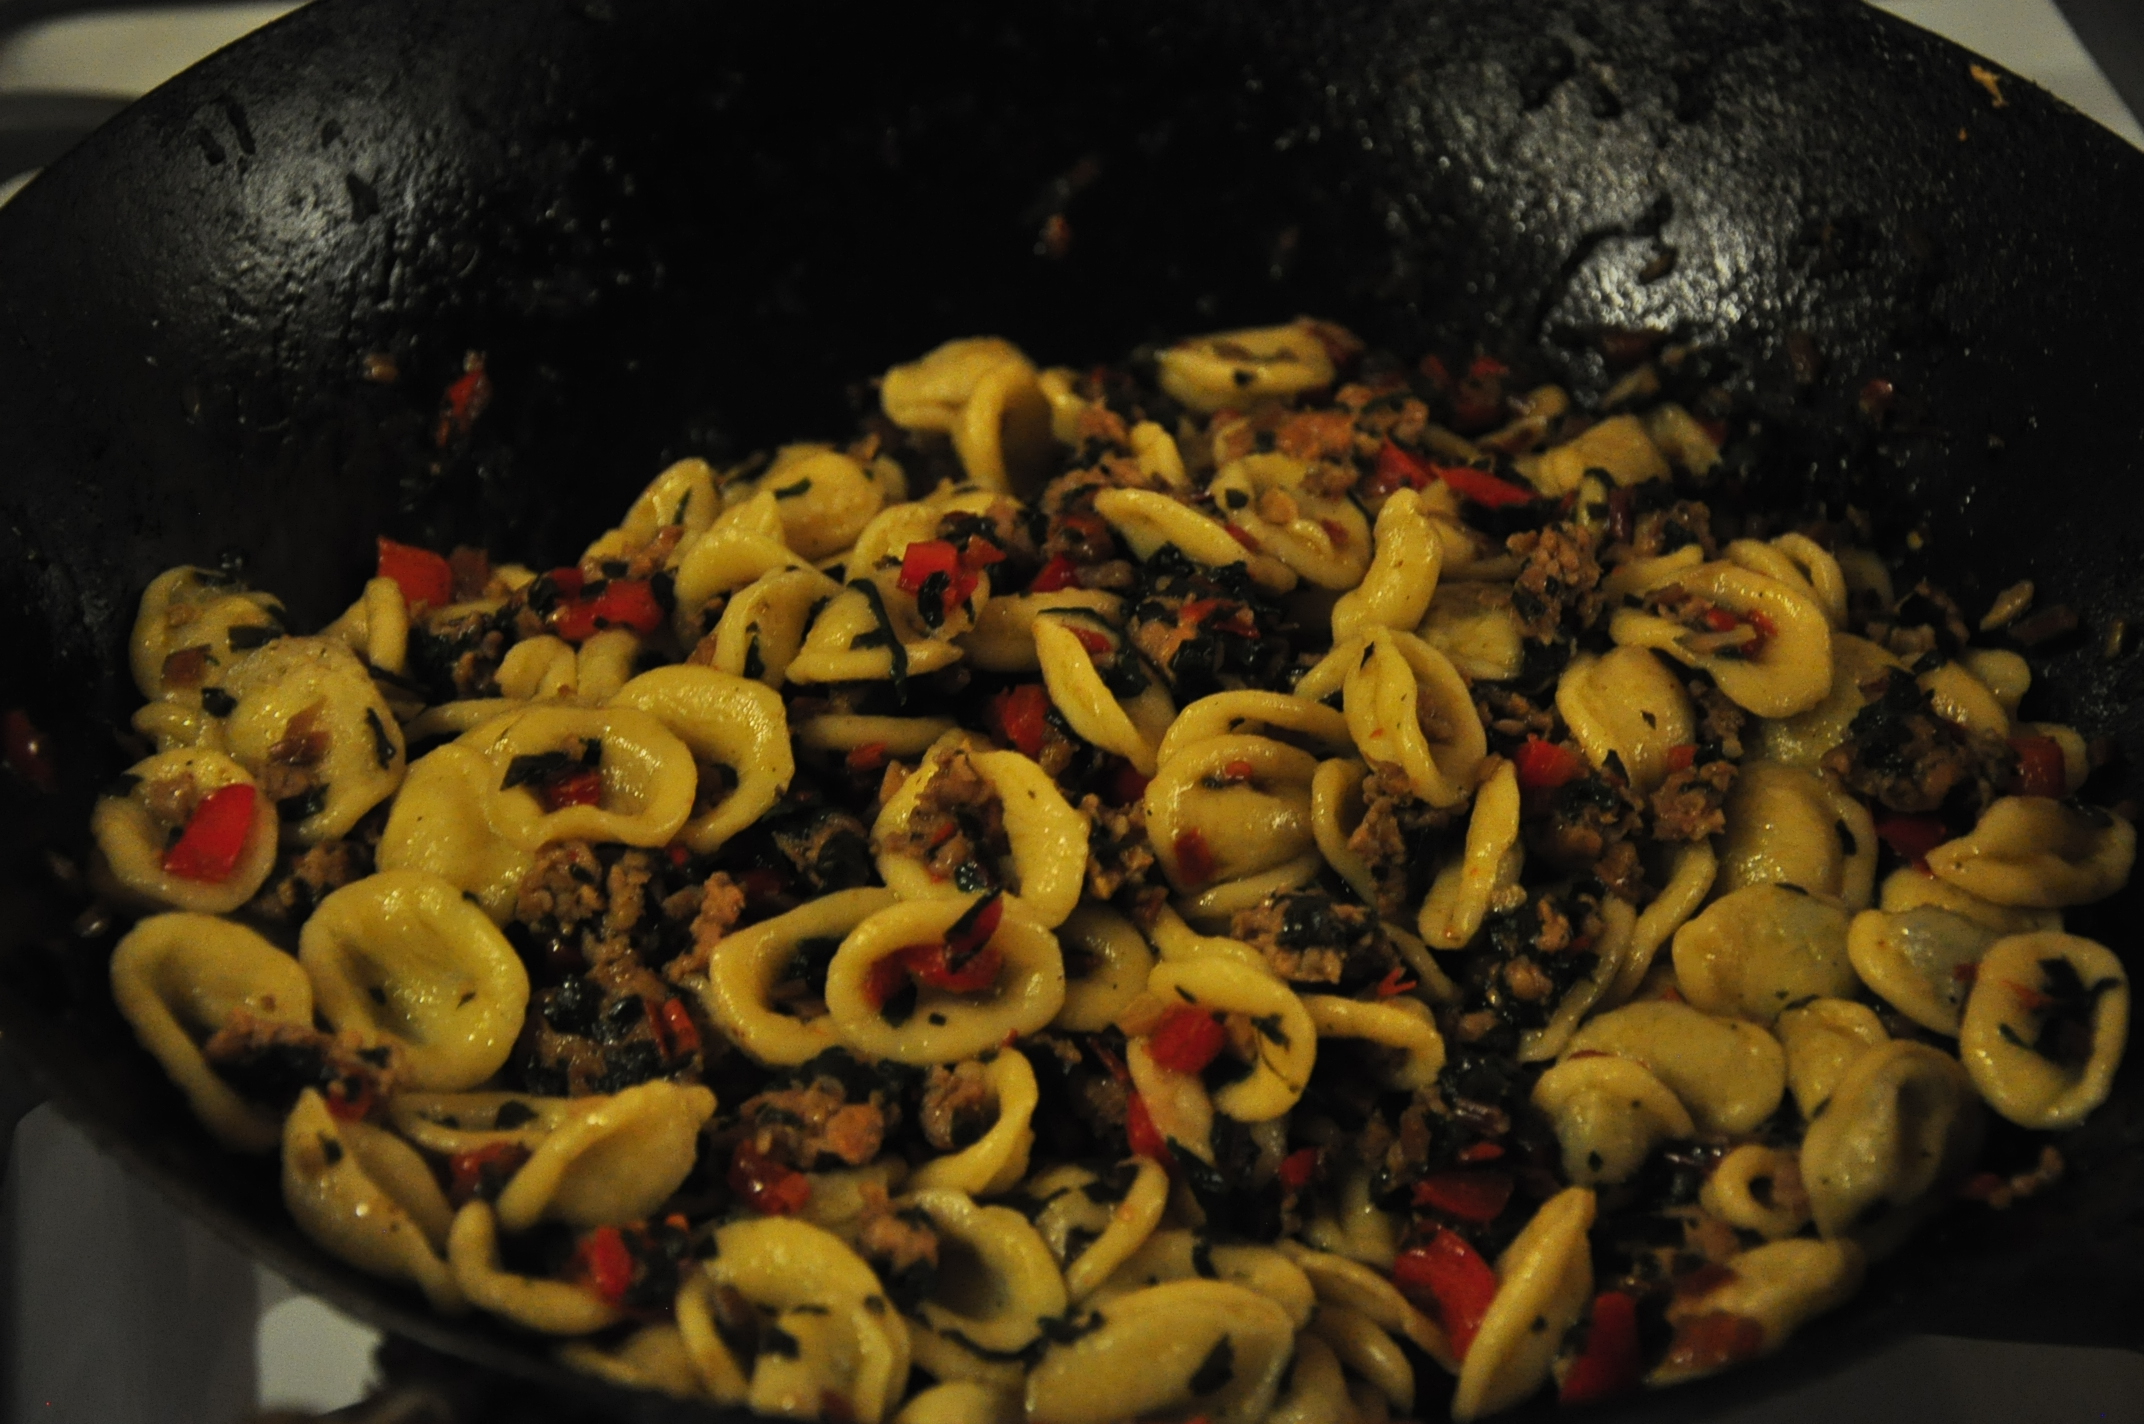
Made all of these “little ears” with my own hands.

Here’s Manu’s recipe for the orecchiette:
semolina flour
water
that’s it!

And here are the ingredients for the sauce she made for the orecchiette (quantities are dependent on how much pasta you’re cooking):
broccoli, kale (though if you can find it you should use rapini or broccoli rabe)
garlic
chili
Italian sausage
salt
pepper
olive oil

And this is how she does it:

Here’s Manu’s recipe for the pici:
2 parts white all purpose flour
1 part semolina
pinch of salt
water
that’s it!

And here’s Manu’s recipe for the sauce she made for the pici:
ripe tomatoes
1 green tomato for extra acidity
garlic
olive oil
salt
bread crumbs fried in olive oil

And here’s how she does it.

Share

Memorable Meals in India: Part 3a – Camel Trek Lunch

Tourists of the desert: Shefali and I show off the latest look from the Thar desert. Okay, maybe not so glamorous but we did avoid major sunburn.

As I mentioned in the last post, one of the more touristy and totally worth it things we did in Rajasthan was an overnight camel trek in the Thar desert outside if Jaisalmer.  It was basically like backpacking except with camels doing all the hard work of carrying all of our stuff and also doing all the walking. Oh don’t get me wrong.  We’re still hardcore.  I mean it was really hot – being the desert and all. We had to drink a lot of warm/hot plasticky water that had been  roasting in the sun, not to mention having to reapply sunblock like seven times. Also, riding camels is really hard on the groins.

Shefali and I with our camel trek guide/ cook extraordinaire: Amaan

Fortunately, we had an excellent guide named Amaan who prepared all of our meals and was generally, a very upstanding young man. And by young I mean he was only 20 or 21 and newly married at that. Please enjoy the following video of my our amazing camel trek lunch prepared by Amaan and eaten by us.


Share

Baguettes!

I like projects. I like bread. I like bread projects. Case in point: baguettes. While the consumption of the venerated French style baguette couldn’t be easier – simply tear off a chunk, take it plain, slather it with butter or cheese, or dip it in some saucy sauce and then deposit in your mouth for mastication – the making of a good baguette is a bit more challenging.  But I like a good challenge so, a couple days ago I attempted to make baguettes following the recipe and instructions of Chad Robertson’s Tartine Bread book, a book for which I’ve developed rather deep emotional feelings.  I would say love would be an appropriate definition of those feelings.

Since my first attempt at the Tartine country loaf, I’ve made several loaves and while I can’t say I’ve mastered the technique, I have become quite comfortable with it and I’ve gotten a feel for how flour, water, yeast (in the form of the natural leaven) and time interact to produce certain results.

Ah, the good ol' country loaf. It's like sitting in your favorite chair, comfortable and reliable. (spoiler alert: baguettes in the background)

Now here’s where baguettes are different.  In addition to using a natural leaven, Robertson’s baguette recipe also calls for the use of commercial yeast in the form of a poolish (basically a leaven made with packaged active dry yeast instead of natural sourdough starter).  I know that the whole point of instant yeast is to be active and spark that fermentation process , but my God, the dial on on this yeast went up to eleven (that’s a Spinal Tap allusion, for all you non-nerds).  As per Tartine instructions I made the poolish (1.5 gram of active drive yeast + 1oo grams of flour + 100 grams of water) the night before I planned on making the baguette dough.  But within an hour of mixing the poolish, it was already rising over the walls of the bowl.  To slow it down a bit, I stirred out the air bubbles and I put the poolish in the refrigerator overnight which seemed to do the trick.  But that yeasty hyperactivity reasserted itself when I made up the dough.  It was like dealing with a hyperactive kid who’s eaten a breakfast of Honey Smacks in Coca-cola.  The baguette dough rose like crazy through the initial fermentation and during the second rise, after shaping it into three separate baguettes, it continued to bubble with activity.  So instead of the neat, svelte baguettes which I was hoping for, I ended up with rather bloated baguettes like Italian loaves you find in the grocery store.  Nevertheless, they were texturally really good with a nice crust and a chewy and airy interior.

I won’t go into great detail as far as method goes, because as I’ve said before, the Tartine Bread book does a better job of describing it and you should get your hands on a copy.  But here is a basic recipe rundown:

Dough (for about 3 medium sized baguettes):
200 grams of natural leaven (2 tsp of starter + 100 g flour + 100 g of water, mixed the night before)
200 grams of poolish (mixed the night before)
250 grams of water
325 grams of all purpose flour
175 grams of bread flour
16 grams of salt

Following the basic country loaf process, I mixed the dough and let it go through a five hour bulk fermentation folding the dough on itself every half hour for the first two hours (for a total of about 4 turns). After five hours, I split the dough into three sections and gave each an initial shaping. After a half hour rest  on the work surface, I folded the three dough sections into elongated baguette shapes and placed them on a floured towel for the second rise of about three hours.

Baguettes in a blanket: after the second rise, my baguettes resembled fat lazy caterpillars.

Now here’s where it gets a little more complicated. Because the baguettes are so long, I couldn’t bake them in the dutch oven so as per Tartine’s instructions I baked them on a pizza stone. During the first 15-20 minutes of baking, it’s important to have a lot of steam and moisture in the oven because it allows for the expansion of the loaves and the formation of a more delicate crust. So again, following Tartine instructions I soaked a kitchen towel in water and put in on a cookie sheet on a rack underneath the pizza stone to produce steam. A brief tip on using this technique: make sure there’s enough water so your towel doesn’t dry out. Let’ just say I didn’t realize towels could burn  and get charred so quickly.

Shroud of Turin?

No, just a burned and charred towel.

After about 20 minutes I removed the cookie sheet and kitchen towel and let the baguettes bake for another 12-20 minutes.  And this was the result:

Baguettes afer baking: a little bloated but I'm happy that they weren't all flat.

Nice airy structure and crunchy crust. Not bad!

While the baguettes were not as tight as I would have liked them to be, I loved the airy structure and texture.  Flavor-wise, they were good – more like a sweet yeasty flavor as oppose to a sourdough tanginess.  Interestingly, when I dipped the bread into some chile verde that I had made, its porky, slightly acidic and smoky chili flavor brought out a lot of the complexity of the bread’s own flavor.  Toast made with slices of baguette spread with homemade jam was simply delightful.

Day old baguette toast with caramel de pommes (apple butter from France!) and homemade strawberry jam (from Michigan!)

Final verdict: Overall it was a success in that the baguettes didn’t flatten out and retained a nice structure.  Taste-wise, while good, I prefer a little bit more sourness so, next time I think I’ll use less poolish and more natural leaven.  Perhaps that will give me more control over the flavor and yield a less hyperactive rise so that the final shape will look not so much like an overweight caterpillar and more like a true baguette.

Share

Pasties!

First things first: the “pasties” I’m referring to in this post are not the ones you’ll find in a fine gentlemen’s club – well unless that gentlemen’s club happens to be in Michigan’s Upper Peninsula (UP) and serves local food.  You see the pasties (pronounced with a short “a” like “nasty”) I’m talking about are a culinary holdover of the Cornish miners who worked the copper mines of the Upper Peninsula when it was booming industry from the mid 1800s to the early 1900s.

Not so pretty, but pretty damn delicious.

A pasty is basically a meat pie or empanada – crusty dough filled with meat, potatoes, carrots and turnips. I guess the pasty is like the working class Anglo Saxon version of the San Francisco style burrito which hailed from another working class population in California, Mexican farmworkers.  It’s an entire meal that travels well and can be eaten with one hand. But while the burrito has been a smash cross- over success -indeed spawning such food monstrosities like the whole wrap movement – the pasty remains a regional specialty.  It’s really easy to find pasties in the old mining towns of the UP, but as of yet there are no pasty chops or pasty trucks hanging on the corners of major metropolitan areas.  So thank the gods I married a small town girl from Michigan who introduced me to this Yooper culinary gem.  When Shef’s mom visits, she’ll bring frozen pasties for us in her luggage.  Now that is love.  But she can only carry so many and we’ve long since eaten our reserve pasties, so a couple weeks ago because we were feeling the urge and we had the requisite ingredients (or most of them) on hand, in our kitchen I decided to make pasties of our own.  The kitchen stars aligned, as it were. This was the my second time cooking pasties. The first time, I got a little too fancy pants – and way too labor intensive, roasting all the ingredients before hand.  So this time I elected to go the more traditional route and it totally paid off.  I consulted a number of recipes online, soaked them in and then basically did what I’ve described below. There’s a lot of prep work involved in these so give yourself a few hours to make them and make it worth your while by making enough for several meals.

Pasty Recipe (makes about 12)

dough:
Basically it’s a pie dough.
3 cups AP flour
1 tsp salt
1 1/2 sticks of butter
1 tbsp vinegar
1/8- 1/4 cup ice water – or just enough for dough to set

Add salt to flour and mix. Cut butter into the flour (pulsing a food processor works best) until you get a pebbly consistency. Add ice water by tbsp an mix by hand or in mixer. Work until the dough forms and holds but don’t overwork (you don’t want it to get to glutinous and elastic because then it’s harder to work later). Wrap the dough in plastic and let it set in the fridge for an hour or two.

Fillings (quantities are approximate)
1/2 lb of ground beef
1/2 lb of ground pork
2 hot Italian sausages (casings removed)
2 medium (or 1 large) onions – diced or chopped
4-6 carrots -finely diced or chopped
1 large rutabaga or 3 turnips (or any similar root vegetable in the turnip or even radish family. We actually used a daikon radish – thanks to our CSA – and it worked fine) – finely diced or chopped
2 lbs of potatoes (yukon gold) – finely chopped.
salt to taste
pepper to taste

Mix:
This is the easy part. Once everything is prepped and chopped just mix everything in a large bowl and add an ample amount of salt and pepper. These are your only seasonings so you can be generous (but don’t give yourself a heart attack). Mix everything together until the meat forms a paste over all the vegetables.

Making:
Now is the labor intensive part. Take your chilled dough and form small balls about 2- 2 1/2 inches in diameter. Flatten these balls our with a rolling pin taking care to roll them evenly so you end up with a dough circle about 7-8 inches in diameter. Put a good couple big spoonfuls of the filling on one side of the, but sure you leave enough space on the edge free of filling. Take the other side and fold it over so the top edge lines up with the bottom edge. Now use moisten the edges with water and seal them. Then, fold up the joined lip of crust and crimp it with your fingers so you end up with a semi circle with pie crust type seal along the curved side. Poke some holes in the top of the pasty so steam can escape.

Cooking:
Bake the pasty in a preheated 375? oven for about an hour and boom!

Post baking - they were delicious. We froze bunch so we'd have some for later.

Eating:
Use whatever utensils you want and whatever condiments you want (I prefer a mixture of ketchup and sriracha) and commence to put into you mouth and chew.  Savor the blend of meaty and earthy flavors … and swallow.  Now you know.  Pasties taste good and they’re not just for covering nipples.

Late night pasty eating. By the time I finished cooking these it was past midnight.

Share

PK’s Yeast Infection…

… fortunately it’s of the sourdough variety – as in Matt’s sourdough starter.  Sure, PK’s been in possession of the starter for a while and indeed has become quite the waffle master, but until this past week, PK had yet to make a loaf of bread. That changed this past weekend when PK attempted his first loaf. Now he’s got the bread bug, and  bad. For the first loaf, perhaps he bit off a bit more than he could chew, attempting a full wheat loaf which came out super dense owing to the fact that he used too much wheat flour (I think two cups). Here’s a picture.

PK's very first loaf: dense wheat (with a shape only a mother could love)

PK says he got through about half of this loaf before he realized he just couldn’t eat something more dense than several of the heavy metals on the periodic table combined.  But not to be deterred, he quickly got back on his horse and baked another loaf which according to all accounts -namely PK’s – he nailed.  Here’s his spin on the recipe:

1/4 c starter
1 5/8 c water
3 1/4 c flour
1/4 c wheat flour
3 tsp kosher salt
Sprinkled with cornmeal
Oven 475-480
20 mins with lid

15-20 mins without lid

Behold...PK's second (perfect - according to PK) loaf.

PK's second loaf has a nice airy quality

And as an added bonus, here’s a short vid of PK thoroughly enjoying his bread. Here’s to many more perfect loaves in the future, PK.  Welcome to the club.

Share